Monday 11 December 2017

How to Disable Webcam in Windows 10/8/7 laptop

How to disable Webcam in Windows 10/8/7 laptop:- Integrated cameras on computers can be pretty useful especially if you enjoy using Skype or similar video calling programs. But those of you who don’t have much use for the camera might be irritated by it as it is enabled by default on Windows 10. Moreover, built-in webcams are in these days and any user would be hard pressed to find a new version of Windows without an inbuilt camera. Security concern is a valid reason why you might want to disable your webcam, as webcams are often easy targets for malware. Regardless of the rapid advancement of technology and the new security measures Windows 10 has come up with, webcams remain an effective tool for suspicious sources to hack into your system and spy on you.

You could always take the help of external software to disable the webcam, but why go to all that trouble when you could easily use the Device Manager method?

Just follow these simple steps to disable the built in camera for your laptop/PC:

  1. Use Windows +R shortcut keys to open the Run command box or manually open it from the Start menu.
  2. Type in ‘devmgmt.msc’ in Run and press the Enter key.


Alternatively – Just search device manager in search box of windows 10 taskbar. Click on device manager.


  • In the Device Manager, select ‘Imaging devices’ from the given list.


Note: – In some other laptops / pc of some other manufacturers, you may find this under different names in place of imaging devices such as: –

Sound, video and game controllers or cameras


  • Under Imaging Devices, right click the ‘Integrated Camera’ option and click on Disable. You will get a message saying ‘Disabling this device will cause it to stop functioning. Do you really want to disable it?” Clicking on Yes will disable the camera.


If the camera option does not say Integrated Camera, don’t get confused, the name of your webcam will be displayed in that space.


Note :- In case you feel the need to use your webcam later, just follow the above mentioned steps and select Enable after right clicking on the camera option.

If you want to check that your inbuilt webcam has truly been disabled, click on the Start button and navigate to Camera. If you see the message ‘Connect to camera’, your webcam has been disabled successfully. In the event the webcam seems to be still functioning, you have probably disabled another device, not the inbuilt webcam, and will have to go back to the Device Manager and choose the correct device to disable.

The Device Manager method will work on Windows 10 as well as Windows 7, 8 and 8.1.

Some Precautions For Webcam


Apart from using this method, there are some safety precautions you can take to protect your camera’s privacy. For instance, you could try covering up the camera with opaque tape or a cloth when it is not in use. Anti-virus is essential if you do use your webcam- a good anti-virus may not always be able to guarantee complete protection against webcam hackers, but it can check files received through the webcam and issue warnings if it contains malware. Hence it is a prudent measure for users with integrated camera on their computers.

A lot of third party software will also help you in disabling the webcam, but most users would prefer to use the simple Device Manager method, which unlike any external software does not involve downloading anything. This method is also fool-proof and hundred percent reliable, making it the best way to disable built in web camera.

Thanks for landing on this post, If you like my post then give your opinion and feedback in comment box.

TAGS:- #How to disable Webcam in Windows 10/8/7 laptop, How to completely disable your webcam camera in Windows 10, #How to disable Webcam in Windows 10/8/7 laptop, #How to turn off built in Webcam in Windows 10, #How to Enable / Disable Camera (or Webcam) in Windows 10, #How to Disable an Integrated Webcam, #​Disable Your Laptop's Built-in Webcam to Protect Your Privacy, #Tips to Disable Integrated Webcam in Windows 10, #How to Disable Integrated Webcam in Windows 10, #how to turn off laptop camera windows 10, #how to enable laptop camera windows 10, #how to turn off web camera windows 7, #how to turn off web camera windows 8

How to Fix: "Battery Plugged in Not Charging" in Windows 10

How to Fix: "Battery Plugged in Not Charging" in Windows 10 :- There is nothing more troublesome than the battery when it comes to a laptop. A very common issue that is faced by almost all laptop batteries is the Plugged in, not charging issue. In this article, I have explained a very simple method using which you can solve this problem. Read on, to learn this simple trick to solve this little issue of yours.

Note : Before trying out, you can unplug the charger and remove and reinsert the battery and see if its working. Sometimes restarting your PC also fixes this problem. If its not working go ahead for the fix.

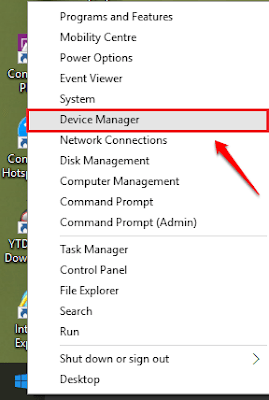
STEP (1) :- Right click on Windows icon to expand out its context menu. Find and click on the option entry named Device Manager as shown below.


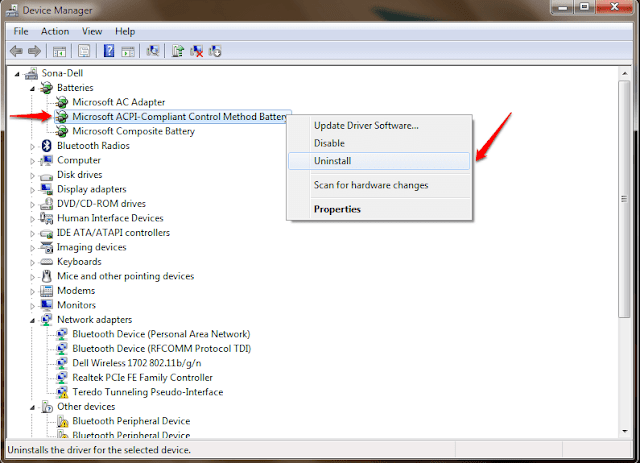
STEP (2) :- A window named Device Manager opens up. Expand the entry named Batteries by clicking on the side arrow associated with it. As next, right click on Microsoft ACPI-Compliant Control Method Battery and click on the Uninstall option.

How to Fix: "Battery Plugged in Not Charging" in Windows 10


STEP (3) :- Now Shutdown your laptop.

STEP (4) :- Now, remove the Battery manually and then unplug the Power Adapter from your laptop.


STEP (5) :- Press and Hold the Power Button for full 1 Minute

STEP (6) :- Now, again reinsert the Battery and connect the Power Adapter to laptop

STEP (7) :- Start the system again. the message “Plugged In Charging” message will be there waiting for you.

That’s it. Try out this simple method today itself.

Note: – If this also does not solve your problem, just run battery health report on your PC and see if Your batteries are healthy or faulty.

You can also try updating Your BIOS to get rid of the battery problem.

Besides the above mentioned method, you could try turning off the system, taking the battery out, holding the power button for 1 minute and putting the battery in to see if it works. If you get stuck with any of the steps, feel free to leave comments. We would be more than happy to help.

Thanks for landing on this post, If you like my post then give your opinion and feedback in comment box.


TAGS:- #How to Fix: "Battery Plugged in Not Charging" in Windows 10, #"Battery Plugged in Not Charging" in Windows 10, #Laptop Battery not charging "plugged in, not charging" Windows 10, #How do you fix plugged in not charging?, #windows 10 laptop issue battery plugged in not charging, #Battery plugged in not charging in windows 10, #What to Do if my Laptop Is Plugged In But Not Charging, #Laptop won't charge after upgrading to Windows 10, #plugged in not charging windows 10 hp
hp laptop plugged in not charging fix, #plugged in not charging windows 10 non removable battery, #plugged in not charging windows 10 asus, #plugged in not charging windows 10 lenovo, #plugged in not charging windows 10 msi, #plugged in not charging windows 10 toshiba, #windows 10 battery not charging to 100

Thursday 30 November 2017

How to Speed up or Increase Internet Speed in Windows 10

Slow internet is the most frustrating thing to experience while browsing the web. Windows 10 users complain a lot about slow internet speed after upgrading to windows 10. By digging deeper we found out that by tweaking just a few settings, you can increase internet speed to a great extent on window 10 computer. Here are some killer tips to fix slow internet speed on windows 10.

Solution 1:- Turn Off Background Apps


This is the second most important step of fixing your slow internet on windows 10.  Many apps run in Background to update to eat your bandwidth and in turn slowing your internet speed. You must turn off background apps to save yourself from data leakage.

Step (1). Open settings panel again.

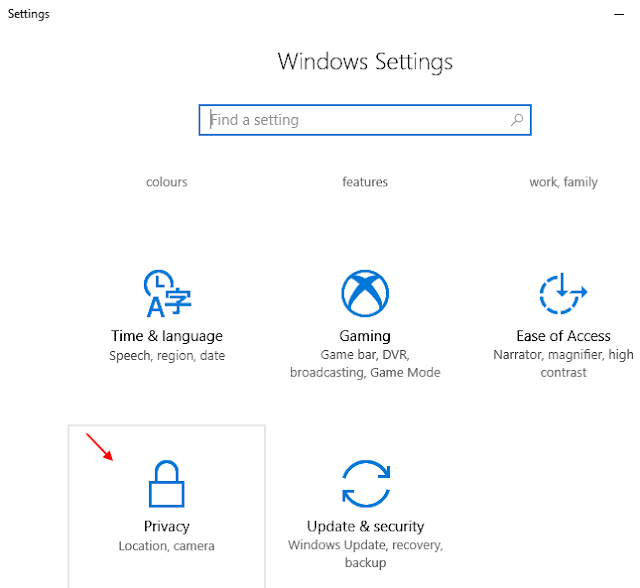
Step (2). Now, click on privacy.

How to increase Internet Speed in Windows 10


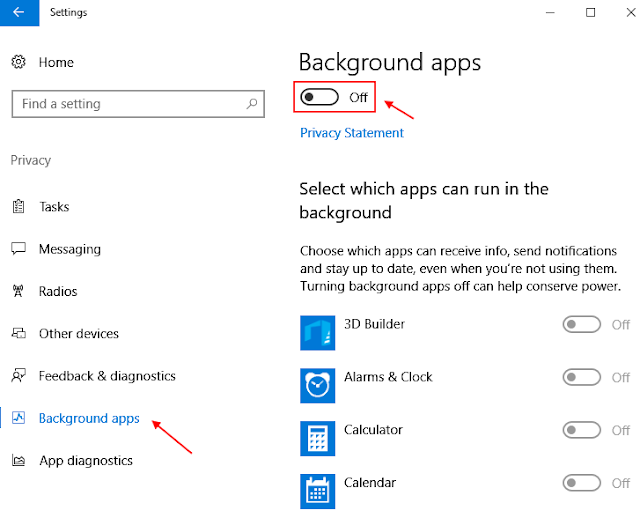
Step (3). Now, scroll down the left menu and choose background apps.

Step (4). Now, turn off Background apps.

How to increase Internet Speed in Windows 10


Solution 2:- Change DNS Settings


How to change the DNS settings either to Open DNS or Google DNS.

For using Google DNS, Type:

8.8.8.8

8.8.4.4

For using OpenDNS, Type:

208.67.222.222

208.67.220.22

Solution 3:- Clear Windows 10 Temp Files And Cached Files


Step (1). Go to Settings – > System -> Storage -> Change how we free up space

Step (2). Now, Click on Clean now to clean all temp files.

How to increase Internet Speed in Windows 10


Also Clear all Kind of Windows 10 Cache to clear Cache and Improve Internet speed.

Solution 4:- Disable Windows Update Service


Although disabling windows update service is not recommended, as it’s always good to keep your PC updated to the latest version of Windows 10 OS, but if you are really struggling with your internet speeds and you want high download speed for a particular file for few days, then you can definitely disable windows 10 update service. You always have the option of turning it on anytime in future.

Step (1). Search services in windows 10 taskbar search.

Step (2). Click on services.


Step (3). Now, Once the services manager window opens up, just find windows update from the list.

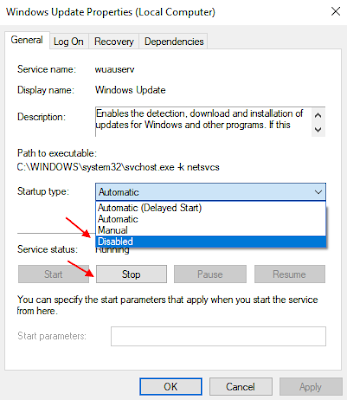
Step (4). Just Click on stop to stop it.

Step (5). Now, change startup option to disabled from the dropdown.

How to increase Internet Speed in Windows 10


Step (6). Now, reboot your PC.


Solution 5:- Disable / Enable Ethernet Or Wifi In Network And Sharing Centre


Step (1). Go to network and sharing centre.


Step (2). Now, click on change adapter settings from left menu.


Step (3). Now, right click on Ethernet or wifi (Whichever you are currently using for the internet) and disable it. Do a right click again and enable it. Just resets the internet.


In Case You Are Using A Router


If you are on Wifi and using a router, just do this. Turn off the router by disconnecting it from electricity. Wait for 10 seconds and then turn it on again. This fixes the slow internet issue most of the time for all version of windows.

Uninstall Onenote App


If you do not use OneNote anyway, you need to uninstall it to save bandwidth spent on syncing files and folders. It also makes your windows 10 system slow and lagging.

To uninstall OneNote just search OneNote , just search OneNote in the search box of windows 10, do a right click and uninstall, it.


Thanks for landing on this post, If you like my post then give your opinion and feedback in comment box.

TAGS:- #How to increase Internet Speed in Windows 10, #Improve Internet Speed, #Improve Internet Speed Save 50% in Bandwidth Usage, #5 Ways to Improve Internet Speed on a Windows Computer, #How to Speed up or Increase Internet Speed in Windows 10, #How To Speed Up Any Internet Connection On Windows 10, #5 Ways to Improve Internet Speed on a Windows Computer, #How to increase internet speed on Windows 10, #How to Increase Internet Speed in Windows 10 by 80%, #Slow Internet Speed on Windows 10 Fix, #

Tuesday 28 November 2017

How to find out the version / Build of Windows Operating system

Sometimes you may want to find out exactly which version of windows OS you are running on your PC. It may be required if you are installing a new software and you want to make sure that its compatible with your version of Windows OS. Here is how to check your Windows OS version.


Method 1 – Find Out The Windows Version / Build Using Run Command


(1). Hold Windows logo key and press R key on your keyboard.

(2). Once the run command box windows opens up, type winver in it and hit enter.


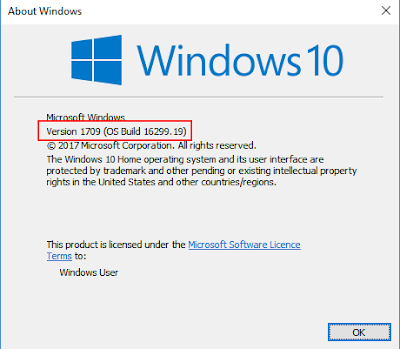
(3). Now,  the windows just popped up will tell you which version of windows OS and build you are running on your PC.

How to find out the version / Build of Windows Operating system


To find out about the build name you can just google the build number.


Method 2 – Find Out Windows Version And Build Using Settings


(1). Open Settings.

(2). Now, Click on System

(3). Now, In the left Menu Click on about.

(4). Scroll down to the section Windows specifications in the right.

How to find out the version / Build of Windows Operating system


Note: Here your windows edition whether its home or pro is shown. Also the build number and versions are written in this section.

Method 3 – Find Your Windows Version Using CMD


(1). Open Command prompt.

(2). The version Number is always written at the top in Command prompt window.


(3). To find more information such as build number of your windows OS, write the command given below and hit enter.

systeminfo | findstr Build

Method 4 – Find Windows Version And Build Using Registry Editor


(1). Press and hold windows logo key and press R on your keyboard to open run.

(2). Now, type regedit in it.

How to find out the version / Build of Windows Operating system


(3). Now, in the registry editor go to the following location from the left side menu.

HKEY_LOCAL_MACHINE
SOFTWARE
Microsoft
Windows NT
CurrentVersion

(4). In the right side all the build number, version number are written.

How to find out the version / Build of Windows Operating system

Method 5 – Find Out Windows Using System Information Window


(1). Press and hold windows logo key and then press pause key on your PC.

(2). In the window that comes, the windows edition is clearly written.

How to find out the version / Build of Windows Operating system


Note: – You can also find out other info such as whether its 32 bit or 64 bit.

Thanks for landing on this post, If you like my post then give your opinion and feedback in comment box.

TAGS:- #Which Windows operating system am I running?, #How to find out the version of Windows Operating system, #How to find out the Build of Windows Operating system, #How to find out the version / Build of Windows Operating system, #How to Find Out Which Build and Version of Windows 10 You Have, #How to determine the version of Windows on a computer, #Find windows OS version from command line, #How to Check Your Windows Version, #How do I know which operating system my computer is running, #What version of Windows do I have installed, #how to check windows version in windows 10, #how to check windows version command line, #what version of windows 8 do i have, #how to check windows os version 32 or 64 bit

Monday 27 November 2017

Free Life Time GPRS In Idea & GPRS Hack Tricks | Send Free SMS All Over World

Every Idea user can’t ignore any free internet in 2017. Same in the case of you too. We are talking this because we have come up with some unlimited Idea free internet tricks. It works for every 2G, 3G, 4G Idea SIM users. The rates of data packs are expensive for youngsters like me. Because we recharge from our pocket money. So, these free data recharge tricks will help for sure. So, why are you waiting? Check all the methods below.

Free Life Time GPRS In Idea & GPRS Hack Tricks | Send Free SMS All Over World

STEP:-


1. First of you are must be prepaid customer, for the prepaid customers you need to send SMS GPRS to 4666.
2. Then you need to send a message to receive the settings, for this send SMS GPRS (first three letters of your mobile phone company and model number). Eg SMS GPRS son K530i. Save thesettings you receive.
3. When you don’t recieve for activation gprs sms then you use these tricks for gprs :-
Proxy Address – 218.242.245.230
Port – 808
User name — Blank
Password — Blank
Data Bearer — GPRS / Packet Data
Access Point Name — internet
Connection Name — Idea GPRS
Authentication – Normal
Homepage – www.google.com

Method (1). Enjoy Idea Free GPS with Proxy Trick 2017


Now you can enjoy free GPRS on your mobile or PC. Yes, this is true. The all-new Idea proxy trick is working perfectly. So, let’s check out the fresh 2017 proxy method now.

Requirement: The account balance should be less than Re 1.


Steps for Mobile Users:

The one and only thing to do here is to configure an APN setting. So, create a new Idea APN setting using the below details.

Account Name: hacktricks.net
Access Point: Internet
Proxy: 186.149.156.119
Port: 80
Home Page: http://google.com


Enter the above details and save the APN settings. Open Google dot com homepage and test it. This Idea free internet method works perfectly in most of the new Android mobile.

Also Check:-


Steps for PC or Laptop Users:

Here are the steps to apply this method to a PC or Laptop. Configure a browse with below settings.
Proxy: 186.149.156.119
Port: 80
Home Page: http://google.com


Configure properly with the above settings and save. Restart the browser and enjoy unlimited free internet with you Idea SIM on PC.


Method (2). Idea Internet Code tricks for Free 2G 3G 4G Data


Ther are many ways to grab some free data packs in your Idea number. But this trick is smooth like butter. It works with Idea free internet code of 2017. So, don’t wait. Grab the easiest method to get 150MB free internet.


Steps to get data with Idea free internet code 2017


  1. First of all, go to your Phone’s Dialer app.
  2. Dial and call these codes: *121*999*9*1# or *121*999*10*1# (use any one).
  3. You just need to dial any of these two free Idea data 2017 codes.


Some Information of this data code:


  • Try at a low balance. It’s best when the balance is ZERO.
  • No speed capping till 150MB.
  • High speed downloading and uploading.
  • Working all over India.


Thanks for landing on this post, If you like my post then give your opinion and feedback in comment box.


TAGS:- #vodafone free gprs settings trick hack unlimited, #idea free gprs settings trick hack unlimited, #how to hack vodafone 3g internet on android, #idea free gprs settings trick hack unlimited, #free vodafone 3g data plan hack, #vodafone free internet proxy for android, #how to use free internet on vodafone in android, #vodafone 3g trick configuration file, #vodafone free internet hack code, #vodafone free internet proxy trick, vodafone free internet proxy trick 2017, #vodafone free internet proxy for android, #vodafone free internet opera mini handler, #IDEA FREE Unlimited INTERNET GPRS and 3G TRICK 2015 for Android, #Get Idea Free 3G Internet Data, #Idea Free Internet Tricks, #Idea Free Internet Tricks for Unlimited Data

How to make your Windows 10 PC discoverable on the network

In this article i will tell you how to change your network location from public to private and make it discoverable on the network . Normally when you connect to the Wifi Network or Ethernet connection for the first time on your PC, its asks you to choose from the two options namely Public & Private. But, once it remembers the network, it never asks you again.

Public network means that the Network discovery and sharing is turned off, while in Private network mode the Network discovery of your PC and sharing on other devices on the same network are turned on. The names are bit confusing as here Public network means No discovery and Private means discoverable on the same network.

How To Make Your Windows 10 PC Discoverable On The Network


(1). Open Settings by clicking on the Windows icon on the taskbar and then clicking on Gear icon.


(2). Now, Click on Network & Internet.


(3). Now, Click on WiFi from left menu.

(4). Finally click on your WiFi network name on which you are connected.

Note: – If its Ethernet connection click on your Ethernet icon.


(5). Now, Choose Private as your network  profile.


That is it. This will make your content discoverable on the network on your windows PC.

Thanks for landing on this post, If you like my post then give your opinion and feedback in comment box.


TAGS:- #How to make your Windows 10 PC discoverable on the network, #make your Windows 10 PC discoverable on the network, #How to Enable Network Discovery and Configure Sharing Options in Windows 10, #How to configure network discovery on Windows 10, #Turn on or off Network Discovery in Windows 10, #How to Allow Your PC to be discoverable by other, #How to change your network location from Public to Private, #Enable or Disable Network Discovery in Windows 10/8/7, #Turn On or Off Network Discovery in Windows 10 Network & Sharing, #Windows / PC not discoverable on network, #do you want to allow your pc to be discoverable by other pcs and devices on this network, #windows 10 network discovery not showing all computers

How To Run A Program As Administrator By Default In Windows 10

Windows by default do not let any program to run as administrator and prevent it from making any unauthorized changes to your system. But, sometimes , you just need to run a program as admin to execute specific commands. Here , in this article i will tell you an easy method with which you can always run an installed program as administrator without right clicking every time and choosing run as administrator.

How To Run A Program As Administrator By Default In Windows 10


(1). Right click on the program shortcut icon and click on open file location.

How To Run A Program As Administrator By Default In Windows 10


(2). Now, right click on the main executable program.

(3). Click on properties again.

How To Run A Program As Administrator By Default In Windows 10


(4). Now, click on compatibility from the tabs.

(5). Now, check the option saying Run this program as administrator.

How To Run A Program As Administrator By Default In Windows 10


That is it. Now, this program will always run as administrator by default in your windows 10 PC.

Thanks for landing on this post, If you like my post then give your opinion and feedback in comment box.


TAGS:- #How To Run A Program As Administrator By Default In Windows 10, Run A Program As Administrator By Default, #How To Run A Program As Administrator By Default, #Run A Program As Administrator By Default In Windows 10, #How to run programs as administrator in Windows 10, #Always run a program in administrator mode in Windows 10, #Run applications as administrator by default in Windows 10, #Configure Applications to Always Run as an Administrator, #How to Make Files, Apps Run Always as Admin in Windows 10, #Make Program always Run as Administrator in Windows 10/8/7, #Always run everything as an administrator,, #always run as administrator windows 7 without prompt, #how to allow standard user to run program with admin rights, #run as administrator windows 10 cmd, #windows 10 run as administrator missing, #always run as administrator windows 8, #how to run as administrator windows 8

Friday 24 November 2017

How to find out the IP address of your router in Windows PC

To tweak any setting on your router, you must know the IP address of your router. Whether it be changing your WiFi SSID password or limit the maximum number of connected devices . Here in this article, i will tell you several ways to find the IP address of your router.

Note: – In most cases the IP address of the router is either 192.168.1.1 or 192.168.0.1. But, if that is not the case, follow the given below methods to quickly determine IP address of the Router.

Method 1 – Using IPconfig Command


1 – Open Command Prompt.

2 – Now, write the command given below.
ipconfig


3 – The IP address written beside Default Gateway in the output is your Router IP address.

Method 2 – Using Tracert Command


1 – Open Command prompt

2 – Now, write the command given below.


tracert www.google.com
3 – The output will contain your Router ip address in the first hop.


Method 3 – Using Network & Sharing Centre


1 – Go to Control panel

2 – Click on view Network status & Tasks


How to find out the IP address of your router in Windows PC


Now, Click on your network Connection icon.


How to find out the IP address of your router in Windows PC


3 – No, Click on details.


4 – Now, look out for Default gateway in this window. That is the IP address of your Router.

How to find out the IP address of your router in Windows PC


That is it. With these methods you can easily find out the IP address of your Router in windows computer.

Thanks for landing on this post, If you like my post then give your opinion and feedback in comment box.

TAGS:- #How to find out the IP address of your router in Windows PC, #Hfind out the IP address of your router in Windows PC, #How to find out the IP address, #find out the IP address of your router, #How to find a router IP address in Windows7,#How to Find Your Router's IP Address on Any Computer,#Checking the Router's IP Address when Using Windows7,#3 Ways to Find the IP Address of Your PC,#Find the IP address of your home router,#Finding your IP address without using the command prompt,#How to Find Your Default Gateway IP Address,#how to get ip address of wireless router#how to find router ip address,#how to find ip address windows 10,#what is my router, #how to find wifi ip address on android, #how to find router ip address mac, #my router settings, #how to find ip address on windows 7

How to block other WiFi Network signals on your Windows PC

You usually connect to your router’s WiFi Daily and use internet until and unless you have evil intentions to use someone else’s WiFi. If you use daily one or two WiFi only, it will be a better idea to block all other WiFi networks from appearing in your available WiFi network’s list.

Here, i will tell you how to block all other wifi network names from appearing and show and use only your frequently used WiFi network.

How To Block Other WiFi Network Signals


(1.) Open Command prompt as admin.

(2.) Now, write the command given below and hit enter.

netsh wlan add filter permission=allow ssid="WIFI SIGNAL NAME" networktype=infrastructure
How to block other WiFi Network signals on your Windows PC


Note: – Just replace your WiFi signal name in place of WIFI SIGNAL NAME.

Similarly , run more commands to add few more wifi signals which you want to allow on your windows PC and which you regularly connect on your PC.

3 – Once you have added all the allowed wifi networks in the list, run the following command given below to block all other wifi signals.

netsh wlan add filter permission=denyall networktype=infrastructure
How to block other WiFi Network signals on your Windows PC


That is it. Now , you have blocked all other WiFi signals on your PC. 


How To Undo Filtering And Blocking Of WiFi Signals

You may want to undo this operation in future due to travelling or some other reason. To undo above operation and make everything back again to default, just run the commands given below.

netsh wlan delete filter permission=denyall networktype=infrastructure

Remove also the allowed wifi signal from the whitelist.


netsh wlan delete filter permission=allow ssid="YOUR WIFI SIGNAL NAME" networktype=infrastructure

Just replace your wifi name in “YOUR WIFI SIGNAL NAME” in the command.

How To View Your Current Filters


To view active filters you’ve created, run the following command:

netsh wlan show filters

How To Block A Particular WiFi Signal Only


To block a particular WiFi signal only, just run the command given below.

netsh wlan delete filter permission=block ssid=”WIFI SIGNAL YOU WANT TO BLOCK” networktype=infrastructure


How To View Your WiFi Current Filter List


To view your WiFi filter list, just type the following command.

netsh wlan show filters

How to block other WiFi Network signals on your Windows PC


That is it. Now, only your desired wifi signals will appear in the list.

How to block other WiFi Network signals on your Windows PC


Thanks for landing on this post, If you like my post then give your opinion and feedback in comment box.

TAGS:- #How to block other WiFi Network signals on your Windows PC, #block other WiFi Network signals on your Windows PC, #block other WiFi Network signals, #How Do I Block Neighboring Wireless Networks, #How To Lock Down Your Wireless Network, #How to Disable Automatic Wireless Connections, #Prevent Windows from Connecting to Unsecured Wireless Networks, #can I stop my laptop seeking Wi-Fi elsewhere, #The Best Way to Block a Wi-Fi Signal, #How to protect yourself against Windows 10's controversial new Wi-Fi, #how to block a wifi network windows 7, #stop automatic connection to wireless network windows 10, #how to block a wifi network windows 10, #block unwanted wifi signals, #how to hide other wifi networks, #how to block wifi signals from neighbors, #how to block a wifi network mac, #how to block a wifi network on android

Related Posts Plugin for WordPress, Blogger...

Labels

404 AdBlock Add-on Airtel GPRS Trick Airtel SMS Trick Alexa Amazon Amazon Kindle Amazon Prime Android Android 8 Android Oreo antivirus Apple Apple Mac ASCII Audacity Audio Authotkey Backup Balance Transfer in Vodafone Battery Bing Blogger Blogging Bookmarklet Browser Camera Chromebook clock Cloud colors command lines Computer Computer Tricks configuration Contact Creative Commons Credit Card CSS devolop DIY Doodle DOS Download Dropbox E-Mail eBook Email Email Attachment Embed Encryption English Error Evernote Eyes Facebook Facebook Tricks Feedburner Flipkart Font Foursquare Free Internet Free sms trick in Vodafone G Mail Gadget Game Getty Images GIF Gists Github Google Google AdSense Google Analytics Google Apps Google Chrome Google Contacts Google Currents Google DNS Google Docs Google Drive Google Earth Google Font Google Forms Google Images Google Map Google Photos Google Play Store Google Plus Google Print Google Reader Google Script Google Sheets Google Spreadsheet Google Translate GPRS Setting GPS Hacking Health App HelloFax Hindi Hoodie HTML Icons idea Image Editing Images IMEI Indian Railways Infographics Instagram Internet Internet Explorer Internet Tricks iOS iPad iPhone IRCTC iTunes iTV JavaScript JioCinema JioTV Junglee Kindle Language Translation Laptop Laptop. TV Life Time FREE GPRS Life-Style Link Linkedln Linux logo Make Money Online Microdoft Powerpoint Microdoft Word Microsoft Office Microsoft Outlook Mobile Mosaic Music Name Networking nexus Notepad OCR Online Shopping Open DNS OS Outlook Password PDF Petya Phillips Hue Lights Photogtraphy Pixel Play Station Podcasts Pokemon Pokemon Go Polls Print Productivity Proxy Server Pushbullet QR Code Ransomware Reddit Reliance Hack GPRS Reliance Jio RGB Ringtone Router RSS Safe Mode Samsung Galaxy S Scrabble Screen Capture Screen Sharing Screencast Secrets Security Send free sms from PC SEO Sierra Skype Slideshare SMBv1 SMS Snapchat Snapdeal Social Media Solution Sound Device Speech Recognition Sql Steam Sync Synology NAS Tata Docomo GPRS trick Teleprompter Torrent Trick Tricks TV Twitter UltraISO Unicode Unknown Extension Unlimited 2GB Unlimited 3GB Unlimited GPRS USB USB Security Key Video Editing virtual desktop Virus attack VLC Vodafone 110% working trick for GPRS Vodafone 3g Vodafone GPRS VPN wallpapers WannaCry Web Design Web Domain Website Wget Whatsapp WiFi Wikipedia Windows Windows 10 Windows 10 S Windows KN Windows Tricks windows updates Winows N Wolfarm Alpha WordPress XBox YouTube Zip
Twitter Delicious Facebook Digg Stumbleupon Favorites More